Monday, April 29, 2013

Pantry Upgrade

It seems like just yesterday I did a cleanup of the kitchen and pantry, and soon the pantry was falling apart again!

Part of it was the wire shelving.. it's pretty much the most awful thing ever! But since I'm going to be renting for a while (and I've already been renting for quite a few years) I've gotten used to it for the most part.

However, after this post from I Heart Organizing, it was time to give my pantry an upgrade!

Supplies:
Foam Board
Contact/Shelf Paper (I got this from Amazon)
Straight Blade to cut down the foam board
Measuring Tape.

Foam Board

I emptied one shelf of the pantry to measure the space, and cut down the foam board....


Taking that last photo made me realize how much that rug needed to be washed!!

After the board was cut down, I cut the contact paper to fit. It was a little wider than the board, but it made it easy to wrap around the edges for a nice, clean look.


Then I just popped it over the shelves....


Then I put everything back!


Finished product??


Much better!!

Friday, April 26, 2013

Spicing things up!

I did a little makeover to our spice rack, just to make things look nicer in the kitchen.


I purchased a few of these( I actually didn't have enough to finish the whole project, but it still looks nicer for now anyway!) from Bed Bath and Beyond. They were .99 each!


And I just moved the spices from their original container into these (I recommend washing them out first...)

I made the labels using these.

And there you have it! A little kitchen upgrade....


Oh, the original containers were a little bigger than the new ones, so I did have some leftover spices. I just put those into the pantry until I can add them to the containers!


Wednesday, April 24, 2013

Studio Update!


So I've been putting off a studio update for while... mostly because it still looks like a tornado hit it!


But now that AD has moved in, a few additional things need to happen in addition to getting this space clean, organized, and functioning. First, we each need desk space (He works from home so this is especially important for him). I love the desk I have, but I’m open to new possibilities, and the current desk would make a great workspace for photographing Etsy products, as well as creating them!

Here’s what we need as far as function:
  • ·        Double desk (something long enough for both of use to sit comfortably and use our respective computers. I just have a monitor, keyboard and mouse, but he needs space for his laptop and another monitor.) I’d also like space for the printer to sit between us (but not crowd into our workspace)
  • ·        Separate workspace for Etsy functions
  • ·        Storage!:

o   Silhouette items (I’m planning on using the Alex unit for just my silhouette machine and accessory items.
o   Mail Station (for all outgoing household mail as well as any Etsy shipments). Simple set up. Stamps for household use and smaller items. Boxes, envelopes, and full adhesive sheets for shipping labels. This will also be where I store things that go in shipments, like business cards or coupons/advertisements.
o   Printer Supplies (I have a lot of different things I want to keep together for the printer besides paper and ink. Photo paper and other specialty papers, as well as blank labels need to be stored close by)
o   Etsy product supplies (This is the main source of my problem right now, as there are so many different things floating around.) Mainly Canvas and paints, Ceramics and Sealers, etc.

Here’s the inspiration for our desk:


1,2,3

 Here's a quick mock up I did to get a little better feel for the space:

We are going this weekend to check out the Habitat Restore in our area, and I have some inexpensive ideas on what to use if that sends us home empty handed. As far as storage, I’m going to use what I have as much as possible, and I maybe be bring in more options after we tackle another large project we have for the dining area. Details on that soon!!

Thursday, April 4, 2013

Jumping on the washi tape bandwagon!

I did a little dressing up of some inbox trays (both for at work and at home in the studio) At work, I lined the tray in blue washi tape...


At home in the studio, the trays got a yellow tape treatment....


It's the simplest project. Just simply line the tray (or whatever you want to decorate!) with the tape. It's easy to remove and re-position if needed, or if you want to change things up later, you just pull it off and start over!


I got my washi tape from Hobby Lobby, but you can find it at almost any craft store, or even online! (the link above is the blue tape I used on Amazon)

And the finished product?


The inbox trays are from the See Jane Work line at Office Depot.


Other things I've updated with Washi Tape? My phone charger...


And some file folders!


Tuesday, March 26, 2013

Master Bedroom

I call this the master bedroom, even though it's the only bedroom used for sleeping. The other bedroom I use for the studio (now that I live alone again.) I've lived here almost a year and it's just now starting to come together.

After a weekend trip to Ikea, I finally got my bed frame! It's this one (in case you want to check it out for your own home) and I'm in love :)


There is quite a bit more I want to do to this room, but now that I've finally got the bed frame (and gotten rid of the horrible box spring I use to have), I've hung all the art in the room (including the gallery from this post),  and it's started to feel a little more like home. Which is good... since I just resigned to stay for another year.

For a comparison, here are a few other photos I took (on my phone...sorry for the horrible quality) The bed frame and head board just make the bed look so much nicer...(although I'll admit I rarely have the bed made!)


That last photo was right after I hung that canvas above the bed.

That small yellow dresser in the corner is now in the studio. I'm looking to get a bigger dresser for the bedroom, probably this one to go with the bed frame. I might have a thing with Ikea....

So that's where I am so far on the Master Bedroom. It's only taken a year....

Friday, March 8, 2013

Change is good (or so they tell me...)

So...I kinda disappeared for a month or so.. at least from the blog world. I've barely kept up with reading my favorite blogs, much less write posts of my own.

A great deal has changed in the past month, with a job change, a new relationship, and many changes around the apartment! All good things... I promise.

I got a little behind trying to keep up with the project schedule I gave myself (starting here), especially with all the traveling I did to visit various family as they came down south to visit and get away from all the snow they are getting up north.

One of my first major projects was to finally get on the gallery wall for my Master Bedroom. Now this formally blank wall looks like this!


I didn't take a photo of the blank wall... it was kinda boring if you can imagine ;)

It was a fairly simple process. Using this method, I started with making paper templates for the frames I wanted to use (and came up with a basic formation by laying them out on the living room floor.)


Then taping them up on the wall....


After hanging all the templates (and moving a few things around since the wall was longer than I had arranged them for) I hung the frames and it looked like this


I decided against those two smaller frames in the lower left corner (and the larger square frame I planned to purchase for where the template was still taped up) and just leave the gallery for the upper part of the wall for now. I may fill the whole wall later, but I'm really happy with how it turned out.

Not all the frames are filled (and that one side ways one is still waiting for some kind of replacement for the really out dated photo it has now.) but I've added a few things!


Like our "tribute" to McGuire's

I'll have studio updates next week as well as a laundry room update and more Master bedroom details!


Friday, February 1, 2013

Ready for the Weekend!!

It's off to sunny beaches again for me this weekend! Even though it's going to be on the cold side, there is still plenty of fun to to be had....


Hope everyone has a fun-filled weekend planned (I'm going to attempt to get some home projects done also since we are getting home early Sunday for the game (which I'm not all that sporty so I'll just check the score every so often...and watch the commercials!). 

Thursday, January 31, 2013

Organizing the Pantry (and the fridge!)


My apartment has a really small and narrow pantry. However, I'll never complain, because it's the first apartment since college that has had a pantry.


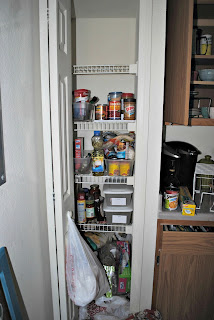
Before Photo (with the cereal removed)
When it came time to (re)organize the pantry, I wanted to have a specific plan in mind. I started by taking a look at what I had (and generally what I buy) and divided it into 6 categories.

Pasta
Sauces
Sides
Breakfast
Mexican
Snacks

Yes, Mexican food items have their own space... I do love all things tacos ;)

I also used this as a bit of a guide:


I took everything out of the Pantry and spread it across the counters. (and didn't take a picture!)

I grabbed a few bins for organizing each section, and started to but everything back.

Canned Fruits, Veggies, and Broths were put on the small display shelf I had for them (and in the soda dispenser, I bought a ton of broth from Sam's Club since Jenn keeps posting soup recipes :) )


Cereal only fits on the top shelf of the pantry, so I keep that up there, with one of my cake carriers and other breakfast items (like pancake/waffle mix). The other carrier doesn't fit in the pantry, so it's in the storage closet in the studio. I only use it for large batches of cupcakes (it holds 36!). Bulk Items (Flour, Sugar, etc) fit behind the can display (Sorry I can't get a photo back there!), so that I can just refill the smaller containers of them when needed. They also keep items from getting pushed to the back and forgotten. I decided against putting the other breakfast items into a bin. It seemed a bit overkill.

Sides and Mexican items are on the next shelf down.


None of the bins have labels yet. I plan to use Chalkboard labels, so I can easily switch things up if I want too.

I keep my pastas divided in clear containers, so they line up on one side, and the different sauces are in the bin next to them. Oils, spices (that don't live on the spice shelf behind the stove) and extra condiments also live here.

The next shelf is snacks. I have a bin for the smaller items, and then bagged chips and pretzels have a space next to the them, but I didn't have any smaller snacks (I really do need to go shopping) so for now, the bowl of chex mix is living there :)


And finally, the bottom shelf holds the baking crate. I keep all my baking supplies in this crate, so whenever I'm in the mood to baking up a storm, I only have to pull this out!


Next, I moved on to the fridge and freezer. These were my inspiration photos:


Here is my "before" photo:


I took everything out of the fridge, wiped down the insides, and threw out anything that was past it's prime. i wanted to label a little in here too, so using some adhesive vinyl, I cut out labels for some bins in the fridge. The plastic bin for yogurt was too narrow to get the words on it, so it got a picture instead. Original inspiration is from here.


I buy cheese in bulk it seems, since I'm always needing a different variety. All the cheese went into one of the bottom drawers. The other drawer is bagged veggies.

I grabbed a few more bins and separated items like deli meats (and other sandwich items) Having all these together makes making lunch a breeze! And since I like a little variety  I used the bigger bin for this. 


And a basket for Dairy Items. I usually keep a lot of butter(s) around because of baking, so a small bin to keep that and cream cheese on hand keeps everything together.Actually, at the moment, I have more cream cheese than I can handle :) (but big plans for it ;) )


The fridge (and pantry)  will stay this empty for a while, since I'll be traveling so much, but at least when I start buying groceries on the regular again, I'll be all organized!

Oh, and the freezer? 


I didn't do much but add a few bins to separate the items (Frozen meats on in the bin on top, and frozen fruit below. I go through veggies fairly quickly so I didn't bother sticking them in a bin this time.  I'll probably do some labeling in there eventually, but generally, as long as I can see what's in the freezer, I consider it organized :)